Remote Overview
The remote is the primary form of navigation in Capture Mate. It will appear on top of any other applications or elements on your screen. The remote is never visible in screenshots or recordings, though this might appear as an option down the line if there is enough demand for it.
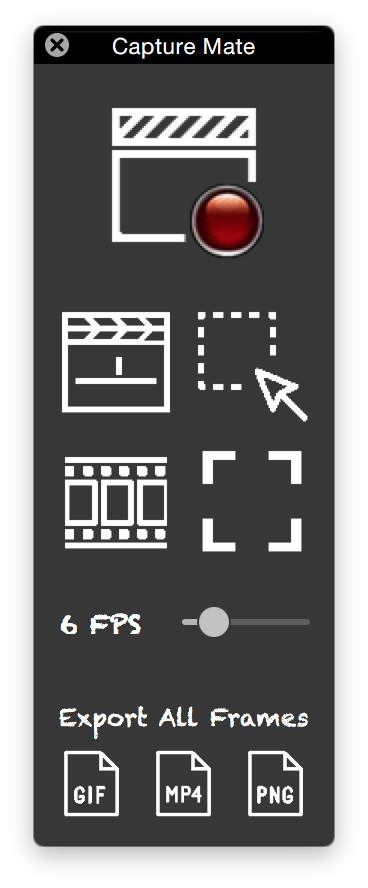
Navigation Remote
Close Remote ⌘Q
Quits the application. Has the same effect as ⌘Q or Capture Mate -> Quit.
Start/Stop Recording ⌘T
Starts recording frames to the timeline at the currently specified FPS. Frames will continue to be added until you hit this button again. Whenever a recording session is in progress the red light is lit up.
Capture Single Frame ⌘C
Take a single screenshot of the currently selected region and add it to the timeline.
Toggle Frame Editor ⌘E
Open or close the Frame Editor.
Toggle Region Selection ⌘R
Opens the region selection panel where you can view and specify where on screen you will be recording. Clicking this button any time the region selection screen is present will close it.
To draw a rectangle, click anywhere on the screen and drag the mouse to indicate your desired region.
Note that mutating the capture rect will also delete any currently captured frames from the timeline.
Select Full Screen
Sets the selection region to full screen. If the selection editor is currently open (see Toggle Region Selection) you will see the screen fill to indicate that the entire thing is selected.
Note that mutating the capture rect will also delete any currently captured frames from the timeline.
By default the entire screen is already selected.
Choose Frames Per Second
Specify the number of frames per second to capture or export. This number can be changed at any time, including between captures or right before exporting.
Export All Frames To Given Format ⇧⌘G, ⇧⌘M, ⇧⌘P
Exports all frames in the timeline out to specified format. Note that in the case of PNGs, a directory is created containing each frame.